0-前言
记录一下自动部署的问题和流程、我的环境如下:
1
2
3
| NexT version 8.21.1
hexo: 7.3.0
hexo-cli: 4.3.2
|
优点:可以直接浏览器编写博客,云端部署的比普通的电脑更快
缺点:云端的环境重置会导致自己更改的插件失效,以及更新时间之类的重置,需要花费一些时间补齐
参考文章利用 Github Actions 自动部署 Hexo 博客 | Sanonz、Hexo GitHub Action CI配置(解决文章修改时间问题) | Calvin Cui、【Hexo自动部署】、hexo自动更新文章修改时间 - 博客园
1-准备
准备阶段1
https://github.com/settings/personal-access-tokens设定你的tokens值
Fine-grained personal access tokens权限规划更完善,点击Generate new token
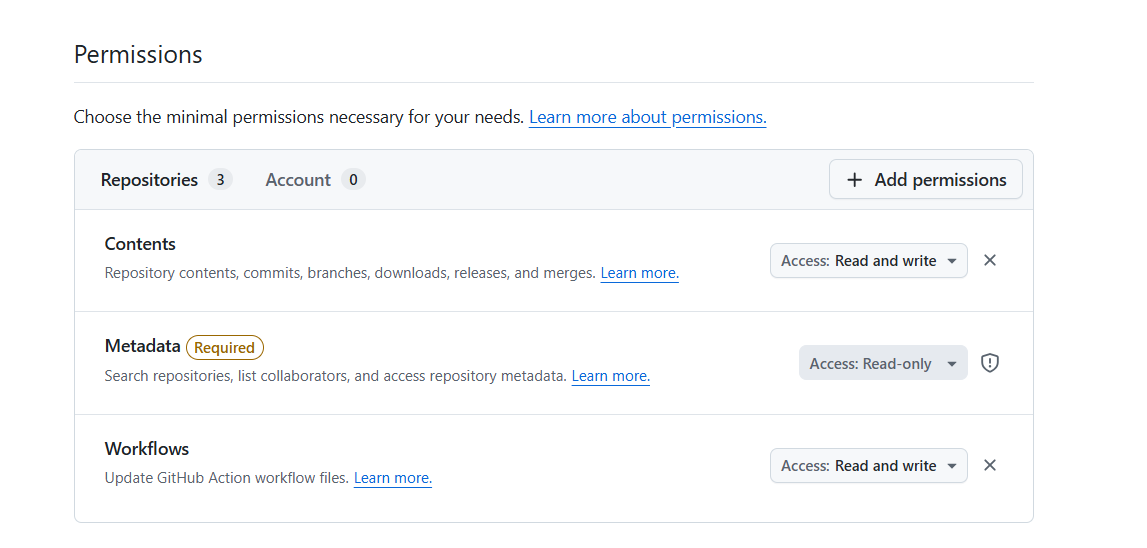
名字和描述不做赘述了,Expiration设定永不过期,Only select repositories选择你的两个库,一个放源码的私有库,一个是上传的公共库。

然后点击右边的增加权限增加库所拥有的权限repository permissions:内容和工作流的读写权限
准备阶段2
tree /f这个是脚本
1
2
3
4
| blog (repository)
└── .github
└── workflows
└── deploy.yml
|
我的deploy.yml如下:(只要更改xxx即可)
1
2
3
4
5
6
7
8
9
10
11
12
13
14
15
16
17
18
19
20
21
22
23
24
25
26
27
28
29
30
31
32
33
34
35
36
37
38
39
40
41
42
43
44
45
46
47
48
49
50
51
52
53
54
55
56
57
58
59
60
61
62
63
64
65
| name: Hexo Total Optimization Deploy
on:
push:
branches: [main, master]
paths:
- 'source/**'
- '_config.yml'
- 'themes/**'
- 'package.json'
jobs:
build-and-deploy:
runs-on: ubuntu-latest
timeout-minutes: 15
steps:
- name: Checkout Source
uses: actions/checkout@v4
with:
submodules: true
fetch-depth: 0
- name: Restore file modification time
run: |
git config --global core.quotepath false
# 遍历 source 文件夹,根据 Git 记录强行修改文件时间戳
git ls-files -z source | xargs -0 -I {} bash -c 'touch -d "$(git log -1 --format="@%ct" "{}")" "{}"'
echo "File modification times restored based on git history."
- name: Setup Node.js
uses: actions/setup-node@v4
with:
node-version: '20'
cache: 'npm'
- name: Install Dependencies
run: |
npm install
npm install -g hexo-cli
- name: Build Static Files
run: |
npx hexo clean
npx hexo generate
- name: Security Deploy to GitHub Pages
env:
GH_TOKEN: ${{ secrets.UPDATE_BL }}
run: |
# 1. 进到生成的静态文件夹
cd public
git init
git config --global user.name "xxx"
git config --global user.email "xxx"
git add .
git commit -m "Site updated by GitHub Actions: ${{ github.event.head_commit.message }}"
git push --force https://x-access-token:${GH_TOKEN}@github.com/xxx/xxx.github.io.git master:master
|
这个yml里面有一个
env:
GH_TOKEN: ${{ secrets.UPDATE_BL }} # 引用你之前存的 Fine-grained Token
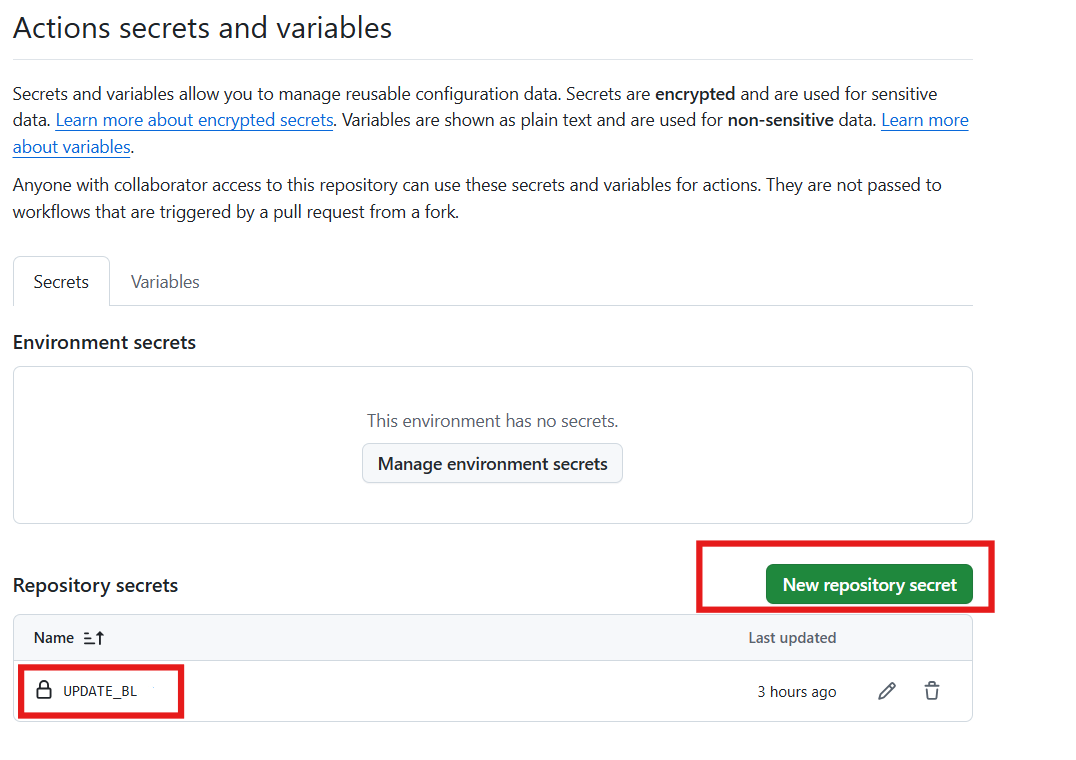
在你新建的仓库里设置一个https://github.com/{用户名}/{你的仓库}/settings/secrets/actions
填入你上面设定好的access token:
Actions secrets and variables的界面
2-上传
初始化上传
1
2
3
4
5
6
7
8
9
10
11
12
13
14
15
16
17
|
git init
git remote add origin git@github.com:cliayn/blog_source.git
git add .
git commit -m "Initial commit: backup my hexo source files"
git branch -M main
git push -u origin main
|
注意:
(themes/next 应该是一个独立仓库的引用,要不删除 Git 追踪,要不添加.gitmodules 这个文件来告诉它去哪里下载 NexT主题)
我选择删除git追踪:
1
2
3
4
5
6
7
8
9
10
| # 1. 移除主题文件夹的 git 追踪状态(注意末尾没有斜杠)
git rm --cached themes/next
# 使用 Windows 强制删除目录及其子文件
Remove-Item -Recurse -Force themes\next\.git
# 3. 重新添加并推送
git add .
git commit -m "Fix: convert theme submodule to regular folder"
git push origin main
|
3-时间处理
因为新建的Actions上传文章是相当于重新填写,所以以后的每篇文章都是最新更新,虽然加入了大佬给的修复代码,但是之前的仍然需要限定更新的时间
在{你放博客的绝对路径下}\blog\下写入该脚本运行:
1
2
3
4
5
6
7
8
9
10
11
12
13
14
15
16
17
18
19
20
21
22
23
24
25
26
27
28
29
30
31
32
33
34
35
36
37
38
39
| const fs = require('fs');
const path = require('path');
const postsDir = path.join(__dirname, 'source/_posts');
console.log('🚀 开始扫描文章并固化修改时间...');
fs.readdir(postsDir, (err, files) => {
if (err) return console.error('读取目录失败:', err);
files.forEach(file => {
if (path.extname(file) === '.md') {
const filePath = path.join(postsDir, file);
const stats = fs.statSync(filePath);
const mtime = stats.mtime;
const formattedTime = mtime.toISOString().replace('T', ' ').split('.')[0];
let content = fs.readFileSync(filePath, 'utf8');
if (content.includes('updated:')) {
content = content.replace(/updated:.*(\n|\r)/, `updated: ${formattedTime}\n`);
} else {
content = content.replace(/(date:.*)(\n|\r)/, `$1$2updated: ${formattedTime}$2`);
}
fs.writeFileSync(filePath, content, 'utf8');
console.log(`✅ 已修复: ${file} -> ${formattedTime}`);
}
});
console.log('✨ 所有文章时间已固化!现在你可以安心 push 了。');
});
|
因为deploy.yml里面写了:
1
2
3
4
5
6
7
| - name: Restore file modification time
run: |
git config --global core.quotepath false
# 遍历 source 文件夹,根据 Git 记录强行修改文件时间戳
git ls-files -z source | xargs -0 -I {} bash -c 'touch -d "$(git log -1 --format="@%ct" "{}")" "{}"'
echo "File modification times restored based on git history."
|
之后的文章就不用管了,上述js脚本运行一次即可